Are you looking to give your home a warm, stylish upgrade that lasts for years? Tongue and groove hardwood flooring might be exactly what you need.
This classic flooring option not only adds natural beauty but also offers a strong, seamless fit that stands up to everyday wear. You’ll discover why tongue and groove hardwood flooring is a smart choice, how it works, and what makes it different from other floors.
Keep reading to find out how this timeless flooring can transform your space and bring lasting value to your home.
Benefits Of Tongue And Groove Flooring
Tongue and groove hardwood flooring offers many benefits for any home. Its design allows each board to fit tightly with the next. This creates a smooth and strong floor that looks great and lasts long. The method also helps prevent gaps and movement over time.
Here are some key advantages of choosing tongue and groove flooring for your space.
Enhanced Stability
The tongue and groove system locks boards together firmly. This reduces shifting and twisting. It keeps the floor stable even under heavy use. The tight fit helps the floor handle changes in temperature and humidity. This makes the flooring less likely to warp or buckle.
Seamless Appearance
Each board connects smoothly to the next. This creates a clean and uniform look. The joints are less visible than with other flooring types. This seamless effect adds beauty and elegance to any room. It also makes cleaning easier, with no gaps to trap dust or dirt.
Durability And Longevity
Tongue and groove floors hold up well over time. The strong connection between boards adds to the floor’s strength. It reduces wear and tear from foot traffic. With proper care, this flooring can last for decades. It maintains its beauty and function for years.
:max_bytes(150000):strip_icc()/157194634-56a49f463df78cf772834e9f.jpg)
Credit: www.thespruce.com
Choosing The Right Hardwood
Choosing the right hardwood for tongue and groove flooring is an important step. The wood you pick affects the floor’s look, feel, and durability. Different types of wood offer various colors and hardness levels. Understanding your options helps you make a smart choice. Consider where you will install the floor and how much use it will get.
Think about the style of your home. Also, consider your budget and maintenance needs. Hardwood floors can last for decades with proper care. The right wood species, finish, and moisture handling will keep your floor beautiful.
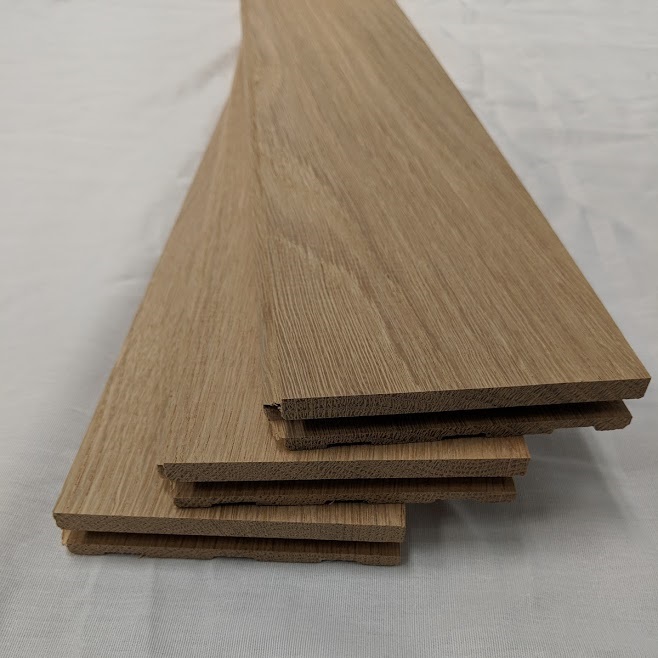
Popular Wood Species
Oak is a classic choice for hardwood floors. It is strong and has a warm color. Maple offers a smooth grain and a lighter shade. Cherry wood has a rich, reddish tone that deepens over time. Walnut stands out with its dark, luxurious look. Hickory is very hard and has a unique pattern. Each species has its own character and strength. Choose wood that fits your style and use.
Finish Options
Finishes protect the wood and change its appearance. Matte finishes give a soft, natural look. Satin finishes add a gentle shine. Glossy finishes make floors bright and reflective. Some finishes are oil-based, others are water-based. Oil finishes soak into the wood and bring out grain details. Water-based finishes dry quickly and have low odor. Pick a finish that matches your lifestyle and cleaning habits.
Moisture Considerations
Hardwood reacts to moisture changes by expanding or shrinking. This can cause gaps or warping. Tongue and groove flooring helps reduce this risk. Still, controlling moisture in your home is key. Avoid installing hardwood in very wet areas like bathrooms. Use a vapor barrier under the floor in basements. Maintain stable humidity to protect your floor’s shape and strength.
Tools And Materials Needed
Installing tongue and groove hardwood flooring requires the right tools and materials. These help make the process smooth and efficient. Preparing everything beforehand saves time and effort.
The tools must be suitable for hardwood to ensure a perfect fit. Quality materials provide durability and a clean finish. Safety equipment keeps you protected during installation.
Essential Installation Tools
Start with a tape measure to get exact room dimensions. A chalk line helps mark straight guides on the floor. Use a flooring nailer or stapler to secure the boards firmly.
A saw is vital to cut boards to size. A hammer or mallet helps tap boards into place without damage. A pry bar assists in adjusting boards and removing old flooring.
Safety Equipment
Wear safety goggles to protect your eyes from flying debris. Use ear protection when operating loud tools like saws. Gloves protect hands from splinters and sharp edges during handling.
A dust mask prevents inhaling fine particles created while cutting wood. Knee pads provide comfort and protect knees during long installation hours on hard floors.
Additional Supplies
Wood glue strengthens joints between boards for extra stability. Spacers maintain consistent gaps around the room edges for expansion. A vacuum or broom keeps the workspace clean and free of dust.
Moisture barrier or underlayment prevents moisture damage and improves comfort. Wood filler fills small gaps or nail holes for a smooth finish. These supplies complete the installation process effectively.
Preparing The Subfloor
Preparing the subfloor is a key step before installing tongue and groove hardwood flooring. A well-prepared subfloor ensures a smooth and long-lasting floor. It prevents issues like squeaks, gaps, or uneven boards.
Proper preparation saves time and money. It creates a strong base for the hardwood to lock into place firmly.
Cleaning And Leveling
Start by removing all dirt, dust, and debris from the subfloor. Use a broom or vacuum to get a clean surface. Check the subfloor for bumps or low spots. Sand down high areas and fill low spots with a leveling compound. A flat surface helps the wood fit tightly together.
Moisture Testing
Test the subfloor for moisture before installation. Moisture can cause wood to warp or swell. Use a moisture meter to check the level. The reading should match the hardwood manufacturer’s guidelines. If the moisture is too high, fix the problem before continuing.
Acclimating The Wood
Let the hardwood boards sit in the room for several days. This helps the wood adjust to the room’s temperature and humidity. Acclimation reduces the chance of expansion or shrinking after installation. Spread the boards out and keep them off the ground during this time.
Step-by-step Installation Process
Installing tongue and groove hardwood flooring requires careful steps for a perfect finish. This process ensures strong, lasting floors that look beautiful. Follow these easy steps for a smooth installation.
Laying The First Row
Start by measuring the room carefully. Place the first row of boards along the longest wall. Make sure the tongue side faces the wall. Leave a small gap for expansion, about 1/4 inch. Use spacers to keep this gap consistent. Align the boards straight to ensure the floor stays even.
Nailing And Securing Boards
Use a flooring nailer or hammer to secure boards. Nail through the tongue at a 45-degree angle. This hides nails and holds boards tightly. Space nails about every 8 to 10 inches. Check each board is snug before nailing. Tap boards lightly to lock the groove and tongue together.
Fitting Around Obstacles
Measure obstacles like door frames or vents carefully. Cut boards to fit around these spots using a saw. Leave the same expansion gap near obstacles. Use wood filler or trim to cover gaps if needed. Take your time to cut precise shapes for a clean look.
Common Installation Challenges
Installing tongue and groove hardwood flooring brings beauty and durability to any space. Yet, the process can present some common challenges. These issues can affect the floor’s look and lifespan. Understanding these challenges helps prepare for a smoother installation.
Dealing With Uneven Surfaces
Uneven subfloors cause problems during installation. Tongue and groove boards may not fit tightly. This leads to an unstable floor and noisy creaks. Leveling the surface before installation is crucial. Use a leveling compound or sand down high spots. A flat surface ensures a strong, even floor.
Preventing Gaps And Cupping
Gaps appear when boards shrink or are not fitted well. Cupping happens when edges rise higher than the center. Both issues harm the floor’s appearance and function. Proper acclimation of wood before installation reduces these risks. Maintain consistent humidity in the room. Tight, well-fitted boards avoid gaps and cupping problems.
Managing Expansion And Contraction
Wood naturally expands and contracts with moisture changes. Without space for movement, boards can warp or buckle. Leave an expansion gap around the room’s edges. Use baseboards or molding to cover these gaps. This small space protects the floor from damage over time.
Finishing Touches
Finishing touches are key to completing your tongue and groove hardwood flooring project. They improve the floor’s look and protect it for years. Proper finishing makes the wood shine and keeps it strong against wear and tear.
These final steps create a smooth, polished surface that feels great to walk on. They also add style by covering gaps and rough edges. Taking time on finishing details shows care and gives your room a warm, inviting feel.
Sanding And Refinishing
Sanding smooths the floor, removing any rough spots or uneven edges. It prepares the surface for a fresh coat of finish. Use a fine-grit sandpaper for the best results.
Refinishing protects the wood and enhances its natural color. Choose between oil-based or water-based finishes. Apply thin, even coats and let each dry fully before adding the next.
Installing Trim And Moldings
Trim and moldings cover the gaps between the floor and walls. They create a clean, finished look. Baseboards and quarter round are common choices for hardwood floors.
Use nails or adhesive to secure trim firmly. Paint or stain trim to match or complement the floor color. This step gives your room a polished, professional feel.
Cleaning And Maintenance Tips
Keep your hardwood floor clean by sweeping regularly. Use a soft broom or vacuum with a floor attachment. Avoid harsh chemicals that can damage the finish.
Wipe spills immediately to prevent stains and water damage. Use a damp mop with mild cleaner designed for hardwood floors. Regular care keeps the floor beautiful and lasting longer.
Credit: www.tongueandgroove.com
Credit: galleriadallas.com
Frequently Asked Questions
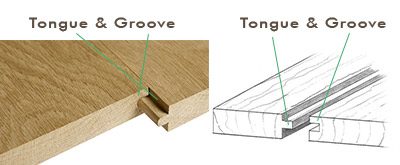
What Is Tongue And Groove Hardwood Flooring?
Tongue and groove hardwood flooring features boards that interlock via a protruding tongue and matching groove. This design ensures a tight fit, preventing gaps and enhancing floor stability and durability.
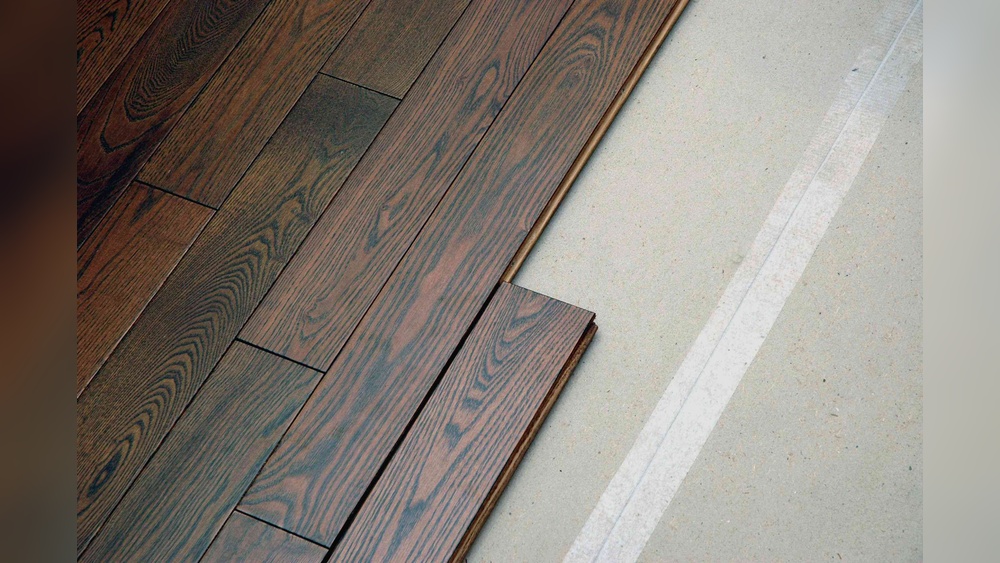
How Does Tongue And Groove Flooring Install?
Installers fit each board’s tongue into the adjacent board’s groove. This method allows secure, seamless joins without visible nails, providing a smooth, uniform floor surface.
What Are The Benefits Of Tongue And Groove Flooring?
This flooring offers improved stability, easy installation, and a sleek appearance. It minimizes gaps, reduces moisture intrusion, and enhances the floor’s longevity.
Can Tongue And Groove Flooring Be Refinished?
Yes, hardwood tongue and groove floors can be sanded and refinished multiple times. This extends the floor’s life and keeps it looking new over time.
Conclusion
Tongue and groove hardwood flooring offers a strong, smooth fit for any room. It holds well and looks great over time. This type of flooring can last many years with simple care. Choose the right wood and finish to match your style.
Easy to install and maintain, it suits both new and old homes. A smart choice for warmth and beauty underfoot. Consider this flooring to give your space a natural, classic feel. Durable, attractive, and practical—all in one package.