Stagger Vinyl Plank Flooring – The Right Way
You want your vinyl plank flooring to look natural. You want it strong. You want it to last. The secret is simple. You need to start your planks in a staggered pattern.
Many DIY installers skip planning and end up with repeating seams, weak joints, and a fake look. This guide explains how to stagger and install vinyl plank flooring for a professional finish that stays stable over time.
Here’s what you need to know: planning, layout rules, common mistakes, tools, costs, and expert advice. We keep it practical and straightforward.
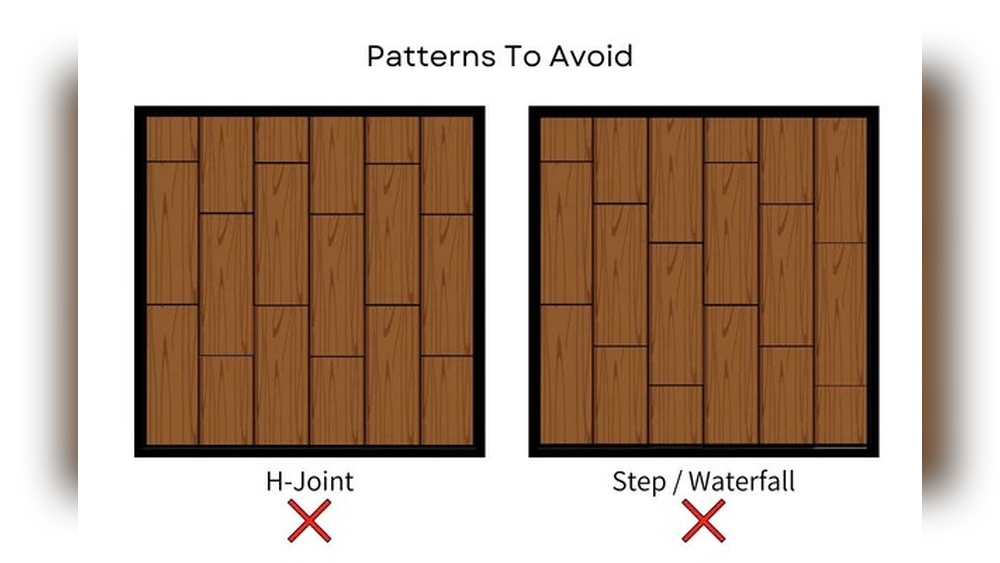
Staggering means placing end joints on different rows instead of lining them up. This creates strength and visual balance. Without staggering, your floor looks unnatural and performs poorly.
The Structural Reason
When seams line up, weight concentrates in one area. Over time, that causes movement and clicking sounds. Proper staggering spreads pressure evenly across the floor.
The Design Reason
Vinyl plank flooring imitates natural wood. Real wood does not repeat patterns in perfect lines. Staggering creates a more realistic flow.
Industry growth also shows why installation quality matters. The global vinyl flooring market reached about $26.8 billion in 2025 and continues to grow as homeowners choose durable, easy-care surfaces.
Planning Your Layout Before Installation
Never start installing planks without a clear plan. Most flooring problems begin before the first plank goes down.
Measure and Prepare the Space
Measure room length and width
Check concrete floor slab thickness if installing over concrete
Decide if you need underlayment for vinyl flooring on concrete
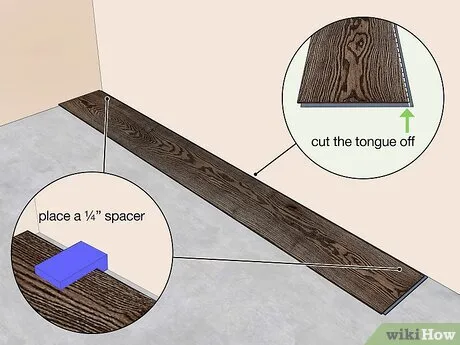
Leave expansion gaps around all walls
If your subfloor is uneven, fix it first. This is one of the most common mistakes when installing vinyl plank flooring.
Decide Your Stagger Pattern
Follow these rules:
Keep end joints at least 6 to 8 inches apart
Avoid repeating patterns every few rows
Mix plank lengths naturally
A simple method works best. Start the first row with a full plank. Use the cut end from that row to begin the next row.
Step-by-Step Guide: How to Stagger Vinyl Plank Flooring
Follow these steps for the best results.
Step 1: Start With a Straight First Row
Your first row controls everything. Use spacers to maintain proper expansion gaps.
Step 2: Cut and Save End Pieces
Cut the final plank in each row and use the leftover piece to begin the next row. This naturally staggers seams.
Step 3: Keep Joint Placement Random
Avoid creating a staircase pattern. It looks unnatural and weakens joints.
Step 4: Check Alignment Often
Every few rows, step back and inspect the layout. Make adjustments before moving forward.
Step 5: Lock Planks Securely
Most vinyl plank flooring uses click-lock systems. Tap gently into place. Do not force joints.
Mistakes You Must Avoid to Stagger Vinyl Plank Flooring
DIY installers often repeat the same errors.
Repeating seam patterns
Cutting planks too short
Ignoring subfloor leveling
Forgetting transition strips between rooms
Installing vinyl like tongue and groove hardwood flooring without following vinyl-specific rules
These mistakes are similar to problems you see when people install closet door track on laminate floor without proper measurements. Planning prevents problems.
Flooring Trends and Statistics (2025–2026)


Vinyl plank flooring continues to dominate residential remodeling.
The global vinyl flooring market was valued at around $26.8 billion in 2025 and is expected to grow steadily through 2035.
Luxury vinyl tile segments lead due to water resistance and easy installation.
Home renovation activity remains strong as homeowners focus on interior upgrades heading into 2026.
Tools and Materials You Need to Stagger Vinyl Plank Floor
Keep your setup simple. You do not need expensive equipment.
Utility knife
Tape measure
Spacers
Rubber mallet
Pull bar
Rubber floor transition strips
Floor sealer for vinyl in moisture-prone areas
Some installers ask about using a nail gun for wood floors. Do not use nail guns on vinyl planks. Click systems lock without nails.
Maintenance After Installation
Proper care helps your floor last longer.
Cleaning Tips
Sweep daily to remove dirt and grit
Use damp mops instead of soaking wet ones
Learn how to get paint off vinyl floor safely
Avoid harsh chemicals
Vinyl plank flooring requires less maintenance than hardwood because it does not need refinishing.
Stagger Vinyl Plank Flooring in The Right Way
Small design choices improve the final appearance.
Use wide planks in open rooms
Add swing arm floor lamps for better lighting
Choose lighter tones like white oak wide plank flooring to make spaces feel larger
Place floor mats at high-traffic entry points
Internal Links
Difference between vinyl and laminate flooring
How to clean very dirty laminate flooring
Basement flooring options over concrete
Care for different types of flooring
External Sources
Vinyl flooring market growth and industry analysis
Luxury vinyl demand and remodeling trends
Home renovation trends for 2026
Frequently Asked Questions
How much should you stagger vinyl plank flooring?
Keep seams 6 to 8 inches apart for strength and a natural look.
Can you repeat the same pattern?
No. Random staggering prevents weak joints and artificial patterns.
Is underlayment necessary for vinyl flooring on concrete?
Some planks include attached underlayment. Always check manufacturer recommendations.
What happens if seams line up?
The floor becomes weaker and more likely to shift or separate.
How long does vinyl plank flooring last?
Most quality products last 15 to 25 years with proper care.
Is vinyl better than laminate for moisture?
Yes. Vinyl handles water better than laminate in most situations.
Visit Homepage